Setting Up a Simple Dante Network for Audio Professionals
In the world of live sound engineering, Dante (Digital Audio Network Through Ethernet) has become the industry standard for transmitting multi-channel audio over Ethernet cables. With its high channel counts, low latency, and versatility, Dante offers an incredible level of flexibility, making it the go-to solution for many engineers and production setups. However, getting started with Dante can be intimidating if you’re not familiar with networking concepts.
What is Dante?
Dante transmits high-quality audio over standard IP networks, allowing audio signals to be routed between devices using regular Ethernet cables. Unlike other multi-channel audio standards like AES50, which is point-to-point, Dante uses IP addresses to send audio across multiple destinations, giving you more routing flexibility.
Understanding Networking for Dante
At the heart of Dante's versatility is its reliance on IP addresses. Each device in the Dante network—whether it’s a stage box, mixer, or computer—needs an IP address. While more advanced users might configure static IP addresses, Dante simplifies the setup for most users by utilizing DHCP (Dynamic Host Configuration Protocol), which automatically assigns IP addresses to devices as they connect to the network.
This means that, with DHCP, you can easily plug in your equipment without worrying about manual IP configurations. Dante also supports both point-to-point and star network topologies, making it adaptable to different types of setups.
Getting Started with Dante
Here’s a step-by-step guide to getting your Dante network up and running:
Gather Your Equipment: You’ll need your Dante-enabled devices (such as mixers, stage boxes, and a laptop), Cat5e or higher cables, and a networking switch if you're using a star topology.
Connect Everything: Using Cat5e cables, connect your laptop to your mixer and stage box. Ensure all devices are powered on and connected to the network.
Open Dante Controller: This free software from Audinate allows you to configure and manage your Dante network. Once your devices are connected, they should appear within Dante Controller’s routing screen.
Name Your Devices: Before making any audio connections, give each device a recognizable name in Dante Controller. Changing names after setting up connections can break existing routing, so it's essential to label everything at the start.
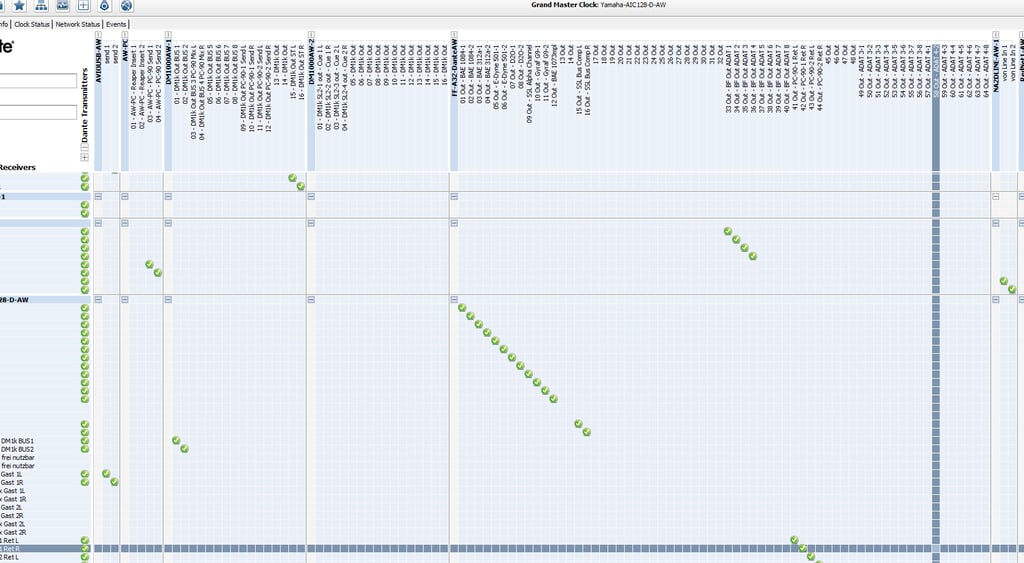
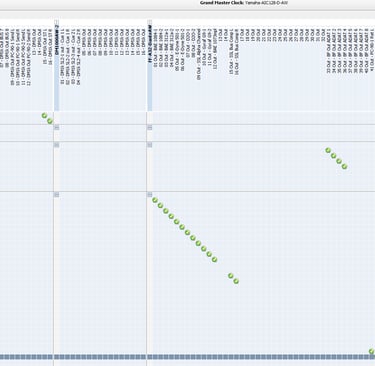
Check Network Status: In Dante Controller, ensure all devices are connected properly by checking the Network Status. Look for green indicators, which show that devices are connected and functioning as expected.
Routing Audio in Dante Controller
Once everything is connected and your devices are named, you can start routing audio. Here’s how:
Transmitting Audio: Start by thinking of where the sound is coming from (transmitter) and where it needs to go (receiver). For example, if you’re routing audio from a stage box to a mixer, the stage box would be the transmitter, and the mixer would be the receiver.
Making Connections: In the routing screen of Dante Controller, click the intersection between the transmitter and receiver channels to connect them. For instance, to send the input from stage box channel 1 to mixer input 1, click where these two channels intersect.
Monitor & Adjust: Once the audio paths are connected, ensure the sound is flowing as expected by monitoring inputs and outputs on both Dante Controller and your mixer.
Troubleshooting Tips for Dante Networks
Here are some common troubleshooting tips to help you solve Dante network issues:
Check Connections: Ensure all cables are properly connected. Bring devices closer together to rule out any cable problems.
Use Correct Cables: Always use Cat5e or higher cables, and ensure the distance between devices doesn’t exceed 100 meters.
Enable DHCP: Ensure your network is set to DHCP to automatically assign IP addresses to devices.
Dedicated Network: If you’re running Dante on a network with other traffic (like video signals or internet), consider creating a dedicated network for Dante to prevent bandwidth issues.
Update Firmware: Make sure all Dante-enabled devices are running the latest firmware and software versions.
Expanding Your Dante Network
Once you’ve mastered the basics, you can explore more advanced setups. For example, you can record live performances by routing audio from the stage box to your laptop using Dante Virtual Soundcard. You can also connect multiple Dante devices across larger networks for more complex audio routing.
Conclusion
Setting up and configuring a Dante network might seem daunting, but once you understand the basic concepts, it becomes an incredibly powerful tool for audio routing and live sound management. By using Dante Controller, you can manage all of your devices in a streamlined, flexible way, ensuring your audio runs smoothly and efficiently. Whether you're running a simple point-to-point setup or a more complex star network, Dante makes it easier to manage audio over Ethernet cables.
For those interested in taking their Dante knowledge further, Audinate provides great resources, including cheat sheets and tutorials, to help you master this essential technology in the world of sound engineering.